SwiftNIO: Introduction to Channels, ChannelHandlers and Pipelines

Let’s keep on exploring the concepts behind SwiftNIO by playing with Channels, ChannelHandlers and ChannelPipelines.
This article was originally published in Mastering SwiftNIO, a new book exploring practical implementations of SwiftNIO. If you are new to SwiftNIO, you may want to first checkout my previous article on SwiftNIO Futures and Promises.
What are SwiftNIO channels?
Channels are at the heart of SwiftNIO. They are responsible for many things in SwiftNIO:
- Thread-safety. A channel is associated for its lifetime to an EventLoop. All events processed for that channel are guaranteed to be triggered by SwiftNIO framework in the same EventLoop. It means that the code you provide for a given channel is thread-safe (as long as you respect a few principles when adding your custom code). It also means that the ordering of the events happening on a given channel is guaranteed. SwiftNIO let you focus on the business logic, handling the concurrency by design.
- Abstraction layer between application and transport. A channel his keeping the link with the underlying transport. For example, a SocketChannel, used in TCP/IP clients or servers, is keeping the link to its associated TCP/IP socket. It means that each new TCP/IP connection will get their own channel. In SwiftNIO, developers are dealing with channels, a high level abstraction, not directly with sockets. The channel itself takes care of the interactions by addressing the underlying socket.
- Applying the protocol workflow through dynamic pipelines. A channel coordinates its events and data flow , through an associated
ChannelPipeline, containingChannelHandlers.
At this stage, the central role of channel may seem quite difficult to understand, but you will get a more concrete view as we progress through our example.
Step 1: Bootstrapping your client or server with templates
Before we can play with channels, pipelines and handlers, we need to setup the structure of our networking application.
Thus, the first step, when you need to build a client library or a server framework, is to start by setting up the “master” Channel and tying it to an EventLoopGroup.
That task can be tedious and error prone, that’s why the SwiftNIO project provides Bootstrap helpers for common use cases. It offers, for example:
- A
ClientBootstrapto setup TCP/IP clients. - A
ServerBootstrapto setup TCP/IP servers. - A
DatagramBootstrapto setup UDP clients or servers. - …
Setting up the connection
Here is the minimal client setup:
// 1
// Creating a single-threaded EventLoop group is enough
// for a client.
let evGroup = MultiThreadedEventLoopGroup(numberOfThreads: 1)
defer {
    try! evGroup.syncShutdownGracefully()
}

// 2
// The basic component to help you write a TCP client is ClientBootstrap. You
// also have a serverBootstrap to set up a default TCP server for you.
let bootstrap = ClientBootstrap(group: evGroup)
    .channelOption(ChannelOptions.socket(SocketOptionLevel(SOL_SOCKET), SO_REUSEADDR), value: 1)

do {
    // 3
    // Connect to the server
    let channel = try bootstrap.connect(host: "towel.blinkenlights.nl", port: 23).wait()
} catch let err {
    print(err)
}
As you can see, we setup the client using three major steps:
1. Create the EventLoopGroup.
2. Create the ClientBootstrap.
3. Connect to the server in a synchronous way, here on remote server on port 23 (telnet).
In SwiftNIO, the ClientBootstrap connect(host:port:) method does more than just triggering a TCP/IP connection. It also “bootstrap” it by setting up the channel, the socket parameters, the link to the channel event loop, and performs several other housekeeping operations.
Note on Threads & Blocking Operations:
In our example, the TCP/IP connection establishment is synchronous: We wait for the TCP/IP connection to be full active.
In a real client, for example an iOS mobile client, we would just use Channel future as returned by connect(host:port) method, to avoid blocking the main UI thread.
Handling errors
The final part of the code is handling errors: as the connection can fail, we catch the possible errors to display them.
In our example, as we are connecting to a famous public “telnet” server (towel.blinkenlights.nl), the connection should work even for you if the network is available.
If you are connecting to localhost instead, where you likely have no telnet server running (you should not), the connection will fail with the following error:
NIOConnectionError(host: "localhost", port: 23, dnsAError: nil, dnsAAAAError: nil, connectionErrors: [NIO.SingleConnectionFailure(target: [IPv6]localhost/::1:23, error: connection reset (error set): Connection refused (errno: 61)), NIO.SingleConnectionFailure(target: [IPv4]localhost/127.0.0.1:23, error: connection reset (error set): Connection refused (errno: 61))])
As you can see, SwiftNIO errors are very precise. Here we clearly see that the connection was refused:
Connection refused (errno: 61)
But if the DNS resolution fails because the host does not exist (for example using localhost2), you would also get a different and relevant error:
NIOConnectionError(host: "localhost2", port: 23, dnsAError: Optional(NIO.SocketAddressError.unknown(host: "localhost2", port: 23)), dnsAAAAError: Optional(NIO.SocketAddressError.unknown(host: "localhost2", port: 23)), connectionErrors: [])
Step 2: Defining your first ChannelInboundHandler
In the current state, the code is of little help. It just opens a TCP/IP connection on the target server, but does not do anything more.
To be able to receive connection events and data, you need associate ChannelHandlers with your Channels.
You have two types of channelHandler available, defined as protocols:
- The
ChannelInboundHandlersare used to process incoming events and data. - The
ChannelOutboundHandlersare used to process outgoing events and data.
A channel handler can implement either inbound or outbound ChannelHandler protocol or both.
Methods in the protocol are optional, as SwiftNIO provides default implementations. However, you need to properly set up the required type aliases InboundIn and OutboundOut for your handler to work. Generally, you will use SwiftNIO’s ByteBuffer to convey the data at the lowest level. ByteBuffer is an efficient copy-on-write binary buffer. However, you can write handlers that are intended to work at high-level and can transform the data to more protocol-specific, ready to use data types. These types of handler are called “codec” and are responsible for data coding / decoding.
For an inbound channel handler, you have a set of available methods you can implement to process events. Here is a few of them:
ChannelActive(context:): Called when the Channel has become active, and is able to send and receive data. In our TCP/IP example, this method is called when the connection is established. You can use that method to perform post-connect operations, like sending the initial data required to open your session.ChannelRead(context:data:): Called when some data has been read from the remote peer. This is called for each set of data that are received over the connection. Note that the data may be split in several calls to that method.ChannelReadComplete(context): Called when the Channel has completed its current read loop.ChannelInactive(context:): Called when the Channel has become inactive and is no longer able to send and receive data. In our TCP/IP example, this method is triggered after the connection has been closed.errorCaught(context:error:): Called when an error happens while receiving data or if an error was encountered in a previous inbound step. This can be called for example when the TCP/IP connection has been lost.
The context parameter receives a ChannelHandlerContext instance. It lets you access important properties, like the channel itself, so that you can for example write back data, going through the outbound sequence of handlers. It contains important helpers that you need to access to write your networking code.
Let’s show a simple InboundChannelHandler implementing only a few methods. In the following code, the handler prints and logs some connection events as they happen (client is connected, client is disconnected, an error occurred):
private final class PrintHandler: ChannelInboundHandler {
    typealias InboundIn = ByteBuffer

    func channelActive(context: ChannelHandlerContext) {
        print("Client is connected to server")
    }

    func errorCaught(context: ChannelHandlerContext, error: Error) {
        print("Channel error: \(error)")
    }

    func channelInactive(context: ChannelHandlerContext) {
        print("Client is disconnected ")
    }
}
The ChannelActive and ChannelInactive methods are called when the connection has been established or closed. The errorCaught method will print any error that occurs during the session.
We will learn more about how the handlers are called in the next section, when talking about the channel’s pipeline.
Step 3: Setting up your channel pipeline
To be able to receive data from the server, you need to add at least one channelHandler to your channelPipeline. You do so by attaching a piece of code to run on each new channel, the channelInitializer. The initializer is called to setup every new channel. That’s the place where you are typically going to define your ChannelPipeline.
What is the ChannelPipeline?
The pipeline organize the sequence of Inbound and Outbound handlers as a chain:
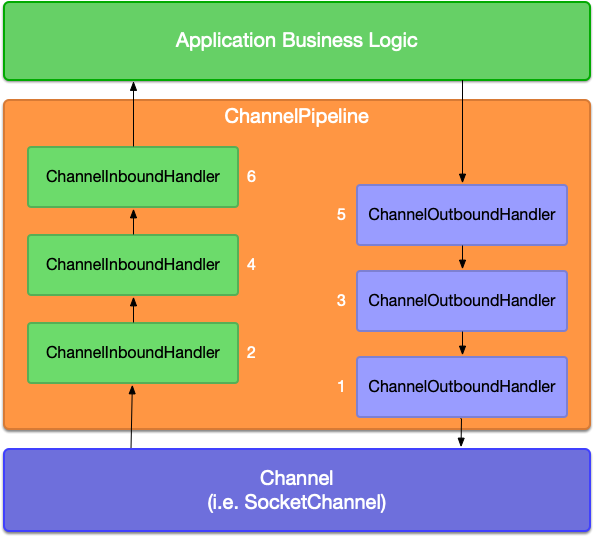
In each handler, you can decide what you want to do with the data you received. You can buffer them, transform them, decide to pass further down in the pipeline chain, etc. An inbound handler can directly decide to react to raw data and post back some data in the outbound channel. As events are processed and refined while progressing through the pipeline, the pipeline and the ChannelHandlers are good way to organise your application to clearly split the networking code from the business logic.
Even though the previous diagram shows for clarity the ChannelInboundHandler and ChannelOutboundHandler instances as separate chains, they are actually part of the same pipeline chain. They are represented as two separate paths, as inbound handlers are only called for inbound event and outbound handlers are only triggered on outbound events. However, a channel has a single pipeline at any given time. The numbers in the diagram show each handler position in the pipeline list.
In other words, when an event is propagated, only the handler that can handle it are triggered. The ChannelInboundHandlers are triggered in order when receiving data for example and the ChannelOutboundHandlers are triggered in pipeline reversed order to send data, as shown on the first diagram.
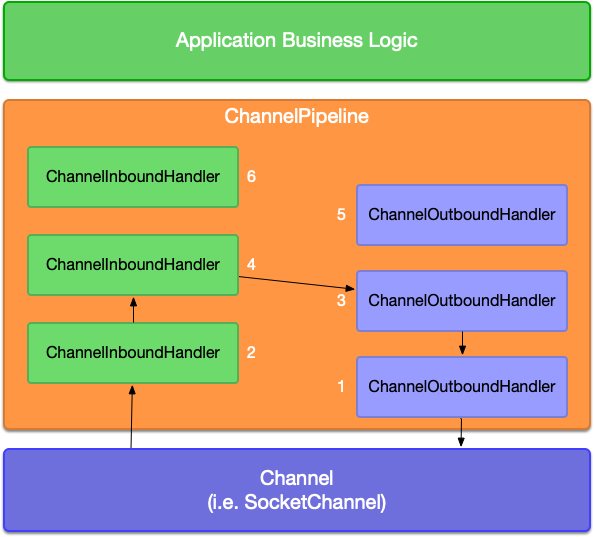
It means that if a ChannelInboundHandler decides to write something back to the Channel, using its context, the data will skip the ChannelInboundHandler chain and directly get through all ChannelOutboundHandler instances that are located earlier in the ChannelPipeline than the ChannelInboundHandler writing the data. The following diagram shows the data flow in that situation:
Pipeline setup
To setup a your pipeline, you can use the method addHandler(handler:name:position:) on the channel pipeline object. The addHandler method can be called from anywhere, from any thread, so to enforce thread-safety it returns a future. To add several handlers in a row, you can use the future flatmap() or then() methods to chain the addHandler calls or you can prefer the addHandlers(handlers:position:) method.
As channel pipeline are dynamic, you can also remove handlers with the method removeHandler(name:).
For a server, most of the pipeline setup would be done on child channel’s handlers, not on the main server channel. That way, the pipeline handler is attached to each newly connected client channel.
Let’s see in step 4 how to process incoming data through a one-handler pipeline.
Step 4: Opening a data stream & processing it
Blinkenlights server
To demonstrate data reception, we will be using a famous public server, whose role is simply to send data over a simple TCP/IP connection.
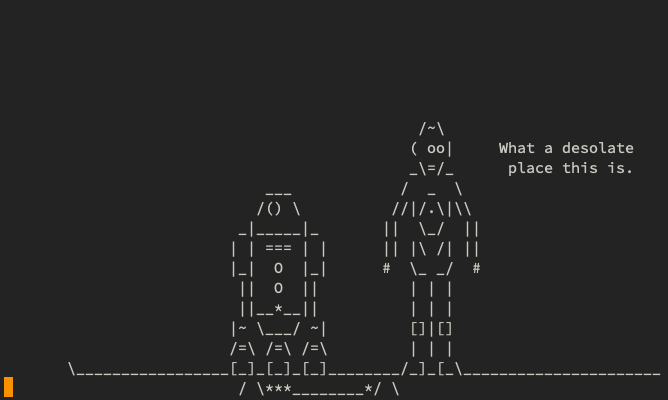
The data are just “pages” of text, with ANSI terminal codes to reset the page display and print them “in place”. Using that trick, that server is playing a ASCII art animated version of * Star Wars, Episode IV*, recreated with manual layout.
Even if you do not run the code from an ANSI compliant terminal, you should be able to see all the pages printed at the bottom of your log file and get of feel of the animation.
Updating our handler code
We are going to add two new methods in our handler:
ChannelRead(context:data:): As our “protocol” is very basic and sending frames to display on a regular basis, we can just accumulate the data in aByteBuffer. Our will convert the data to a buffer, usingself.unwrapInboundIn(data)method and add it in a temporary buffer.ChannelReadComplete(context): In our example, as we are reading frames, we will be using that method to actually display the data we have previously buffered. We assume that when we have no data available to read, we have read the full frame. We then print the content of our temporary buffer to the terminal at once and empty the buffer.
We also modify the ChannelActive(context:) method to allocate and set up our temporary ByteBuffer. You can reuse the channel allocator from the context to allocate your buffer.
Here is the code of our PrintHandler:
private final class PrintHandler: ChannelInboundHandler {
    typealias InboundIn = ByteBuffer

    var buffer: ByteBuffer?

    func channelActive(context: ChannelHandlerContext) {
        buffer = context.channel.allocator.buffer(capacity: 2000)
        print("Client is connected to server")
    }

    func channelRead(context: ChannelHandlerContext, data: NIOAny) {
        var byteBuffer = self.unwrapInboundIn(data)
        buffer?.writeBuffer(&byteBuffer)

    }

    func channelReadComplete(context: ChannelHandlerContext) {
        if let length = buffer?.readableBytes {
            if let str = buffer?.readString(length: length) {
                print(str)
            }
        }
        buffer?.clear()
    }

    func errorCaught(context: ChannelHandlerContext, error: Error) {
        print("Channel error: \(error)")
    }

    func channelInactive(context: ChannelHandlerContext) {
        print("Client is disconnected ")
    }
}
Note that when reading the data, they are converted to our InboundIn typealias (in that case a ByteBuffer), using unwrapInboundIn() method. There are several provided unwrappers (i.e. to ByteBuffer or FileRegion), but you can also create custom ones.
The overall SwiftNIO code setup is very simple:
let evGroup = MultiThreadedEventLoopGroup(numberOfThreads: 1)
defer {
    try! evGroup.syncShutdownGracefully()
}

let bootstrap = ClientBootstrap(group: evGroup)
    .channelOption(ChannelOptions.socket(SocketOptionLevel(SOL_SOCKET), SO_REUSEADDR), value: 1)
    .channelInitializer { channel in
        channel.pipeline.addHandler(PrintHandler())
        }

// Once the Bootstrap client is setup, we can connect
do {
    _ = try bootstrap.connect(host: "towel.blinkenlights.nl", port: 23).wait()
} catch let err {
    print("Connection error: \(err)")
}

// Wait for return before quitting
_ = readLine()
The main change with previous setup is that we have been adding a channelInitializer, in charge of setting up the channel pipeline with our PrintHandler.
Note: A pipeline is Dynamic
What you need to keep in mind about the channel pipeline is that it can change during the lifetime of the channel. The channelInitializer will be called to setup an initial pipeline. However, you can change it at any time during the life of the channel.
Many protocol implementations are using this feature to model protocol state switching during the communication between a client and server.
Step 5: Running the code
You can check the full example code from Github: Blinkenlitghts.
Build and run it with:
swift build
swift run
So, finally, when you run the SwiftNIO console application from your terminal, you should be able to see an ASCII art Star Wars, Episode IV story:
Conclusion
This example is very simple but already give you a glimpse at how you are going to organise a SwiftNIO client or server.
With your new knowledge on channel handlers and pipelines, you should be able to understand simple client / server examples, like the echoClient and echoServer examples in SwiftNIO repository.
Channels, Handlers and Pipelines are really at the heart of SwiftNIO architecture. There is a lot more to learn about handler and pipeline, such as handlers implementing protocol coder / decoder (codecs). We will dig into more advanced topics in a next article and in my “Mastering SwiftNIO” book.
In a next post, we will show how to use multiple handlers in the pipeline to process raw data, process data through codec and pass the resulting info to your higher level application handlers.
In the meantime, you should already have a lot to play with.
Please, do not hesitate to ask for questions and share this article, if you liked it.
Photo by chuttersnap on Unsplash